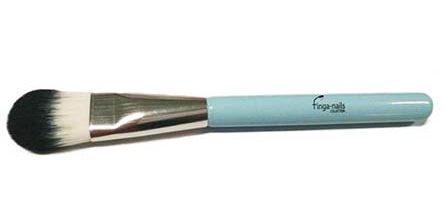
Posted on Leave a comment

How to clean your makeup brushes

Foundation Make-up-brush

Regularity

How often should you wash your make-up brushes? weekly?,monthly?,or do you NEVER clean your brushes?

Ideally, you should be washing your brushes weekly, but realistically you shouldn’t leave it more than a few weeks between cleaning. A neglected make-up brush is basically a breeding ground for bacteria.

Why clean?

Even with freshly cleansed skin, every time you put a brush to your face you’re transferring bacteria from the skin to the brush. Without proper regular cleansing, your make-up brushes will become a breeding ground for dirt and bacteria, putting your skin at risk of pimples and breakouts.  If you do suffer from problem skin then up your brush cleaning regime to help.

How to clean?

Take a tall beaker and fill almost to the top with clean warm water adding a splash of liquid soap or gentle shampoo. Put the brush in the beaker and with quick, sharp up and down movements, let the water spread through the bristles.  When the water becomes the colour of tea, change the water and repeat the process until the water is clear. To protect the bristles and shape, try not to bang the bristles too much on the beaker base .

Next

Add a small about of makeup remover  to  a cup or beaker and put in the freshly cleaned brush. You’ll be amazed to see there is even more makeup still trapped in the bristles.

Finally

To totally clear away any chemicals , fill the beaker with clean warm water and add a teaspoon tip of bi-carb, and with quick, sharp up and down movements, let the water spread through the bristles. Leave the brush to dry naturally in a warm environment. Avoid direct heat such as a radiator as this may affect the glue used to form the brush bristle.

Posted on Leave a comment

Vitry Nail repair treatment for weak nails

Vitry Nail repair treatment for weak nails

Having suffered with problematic weak nails for most of my life and a drawer full of every conceivable product known to man for fortifying fingernails, when my partner suggested I try Vitry Nail repair treatment I was skeptical. Expecting yet another solution to be consigned to the drawer I did not have high expectations.

When it arrived I applied to my nails and renewed every three days as directed. To my surprise I noticed that my nails no longer snagged on my clothes as I dressed each morning and in days I began to see a difference.

I could actually start to see my nails above my finger ends and was thrilled.

I ‘d never even needed to cut my nails before as they always broke and was amazed at the difference Vitry Nail repair treatment had made.

Vitry nail repair treatment

I proudly began to paint my nails and actually started to receive compliments from complete strangers. The first one was in my local supermarket when out of the blue someone said my nail were lovely. I could have cried I was so happy. Now my nails have grown I simply re-apply Vitry once a week.

I will never be without Vitry Nail repair treatment and I can honestly say it’s changed my life!

So I ask, why pay for monthly expensive wraps & gels when VITRY will help you to grow your own nails?

For me Vitry Nail treatment is the ULTIMATE solution for problem nails.

Posted on Leave a comment

Cuticle Care for a perfect manicure

[banner title=”Cuticle Care for a Perfect Manicure” title_color=”#ffffff” bg_color=”#cecece” subtitle=”Nourishing Cuticle Oil”]

To create the best possible manicure you cannot overlook the importance of preparing your cuticles beforehand. Tending to your cuticles will elongate the nail length so that you can paint closer to your skin and it will also help achieve a longer lasting manicure finish.

What are cuticles?

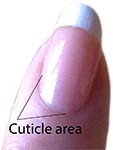
The Cuticle is the narrow band of skin that surrounds the nail attached to your finger and it  protects the root of the nail  from bacteria.  It’s essential to keep cuticles moisturised as they’re supposed to be soft!

Some people advocate cutting the cuticles but be warned; cutting the cuticle can make you susceptible to skin irritations and infections and can actually lead to harsher and tougher cuticles. Instead of cutting your cuticles they should simply be pushed back using the rounded end of a wooden cuticle stick. Wooden sticks are gentler on the cuticle than harsh metal pushers.

Cutile care for a perfect manicure

Firstly wash your hands in warm soapy water and pat dry.  This will soften the skin and create better absorption.  Apply finga-nails cuticle oil  generously to the nail and cuticle area, massaging in until it’s fully absorbed.

Then using  finga-nails cuticle pusher or a wooden cuticle stick, gently push back the cuticle skin. Once this is tucked away you can begin your manicure.

A dab of cuticle oil applied a few minutes after painting your nail will also help speed up the drying process.

Make it a routine, keep a bottle of cuticle oil by your bedside and apply before retiring to keep your cuticles soft and healthy.